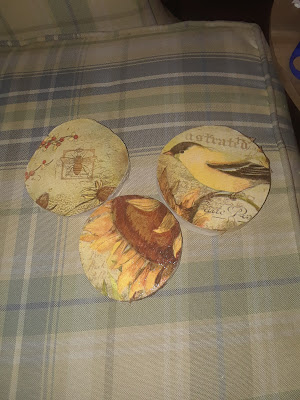
Decoupage Coasters!
I have tried my hand
at a few different decoupage items and I really love it now. It was hard at
first and I really have to say I watched a video on it that helped but for the
life of me I can’t find the video now. My first go at decoupage is with
coasters and then later picture / story cubes!
Take the napkin and slowly
peel the edge until you peel the back 2 layers leaving the top colored or
designed layer which you will use. 3 ply napkins work better than 2 ply I have
learned. 2 ply top layers are thinner and don’t adhere as nicely but I’ve used
2 ply ones before because I just loved the design so much. So, it is super easy
you put some mod podge down on the area you want covered so me I put on the
wood rounds all the way to the edges. Now lay the thin top layer of the napkin
you have peeled off onto the item slowly. With your fingers smooth slowly to
the edges taking any bubbles out but if you don’t get all the bubbles out don’t
worry there is a trick to it. You can take a piece of parchment paper and lay
it over the adhered napkin once the mod podge is dry and take an iron to it to
smooth it out and I have to say this does a fantastic job smoothing it, this
method I learned in the YouTube video I watched. Now you’re supposed to wait
until its dry to iron or the glue will go through and attach to the parchment
but I always iron it right away I just am careful and pull the parchment off less
than a second after ironing so it doesn’t stick and take the napkin off. If
your more comfortable though you can wait until it is dry as recommended.
Now take sand paper
and slowly go around the edges of wood chunks taking the napkin that is hanging
over the edges away and smoothing it. Now once you have than you done you put
mod podge over the top of the napkin and let it dry. It will bubble a bit but
don’t worry it will go away this time without having to iron it. Once dry you
have a great new coaster! I actually make my coasters two toned so one side has
one design and flip side a different one so you get the most out of your
coasters and don’t have to make so many, unless you just want to lol!
These make great gifts as well but I will say I learned that after the second dry time or even between the first mod podge and second top layer allow at least a day to fully dry or else if you put the top on right away give it a few days to fully dry and then start testing them. What I mean is stack them after a day and then let them sit and then unstack them and see if they stick together if so let them dry even more before stacking them again so they don’t stick and damage the coaster. And definitely allow this dry time before stacking to give as a gift or they will have stuck together coasters. This dry time also helps so they don’t keep sticking to glasses with condensation.
- · Wood Rounds- $2-$5 for packs of 4-6 round wooden chunks at Tuesday Morning Store
- · Napkins- $1-$5 depending on the size and design of the napkins at Tuesday Morning Store, thicker 3 ply napkins work better than 2 ply
- · Mod Podge- $1 for small tube at Dollar Tree or a few dollars at any craft store
- · Sand Paper- $1 for multi degree sand paper at Dollar Tree


Comments
Post a Comment