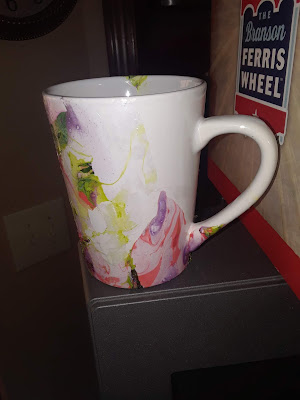
Nail Polish Marble Decorating!
A year ago, Spring 2018, I was looking for fun new crafts to
try and stumbled upon nail polish marbling and decided to give it a try and did
it with my husbands grandmother Jeri. I have to say the effect this makes is cool
but the smell is anything but lol! I recommend a well ventilated area or
outside and maybe even wear a mask or something. Some people recommend gloves
too but all I had was chunky dish washing gloves and they didn’t work well when
holding glasses and small things so I was forced to go bare handed so the nail polish
painted my hands which was an interesting thing and was quite the clean up as
well lol. Definitely have tons of nail polish remover on hand.


So basically for me it was trial and error. So using a
plastic mixing bowl, one you intend to only use for this or throw away later,
you add water but the temperature if I remember can’t be too cold or too hot
or the effect won’t come off right. So once the temperature is just so, and you
can do this over and over until you find the right temp for the project your
doing, that’s when the fun begins. You take any mixture of nail polish colors
you want, bear in mind newer polishes work and adhere better, and start to pour
them into the water in the bowl in any design you want. Some people used tooth picks quickly to get the design but almost immediately as it hit the water for me if I tired a toothpick or something else it adhered to the toothpick and was useless so I made
designs as I was pouring the nail polish in.
Then basically you take the item you want to be marbled and
dip the part you want painted quickly into the center of where the paint is and
draw it out. Make sure that if its going to have candles in it that you don’t get
nail polish inside the container. Its probably safest to use LED tealights. Once
dipped put them down to dry on the side that wasn’t dipped and again bare in
mind it takes a bit of time to fully dry.
It was fun trial and error with my husbands grandma Jeri but
I say it was a smelly adventure and I had a major headache from the fumes
afterwards lol. I dipped a medium sized terra cotta pot I had hand painted prior to dipping which was my favorite
but it was accidentally broken recently by my husband Anthony but he glued it
back together as best he could. I also dipped a mini-terra cotta pot and saucer
which was beyond adorable and it holds my relaxing stone ball. I then dipped a
clear bowl which didn’t turn out so well but now I have it on a blue pedestal and
it looks better. Next I dipped a chipped effect glass cup and then another
regular clear glass cup in and I loved the effect on those and they house LED
tealights on our living room table now. Next up was a small glass jar that
looks like lava now. Lastly I dipped a white coffee cup in and it is my favorite
alongside the medium terra cotta pot.
With this you will never get the same look twice even using
the same colors and for that I think it is also pretty cool! With this nail
polish marbling effect you can also use it on so many different mediums which
its versatileness is pretty cool too! These would make fantastic gifts as well!
- Nail Polish- Range in price from a few cents to a few dollars, newer or recently bought polish works best with this technique but old been in the cabinet a bit works good sometimes. I have over 30 nail polishes, new and old, so I had plenty to play around with, lol!
- Nail Polish Remover-$1 at Dollar Tree
- Cotton Balls- $1 at Dollar Tree, to rub the pesky left over nail polish off your hands
- Plastic Mixing Bowl- A few dollars at virtually any store
- Clear Bowl-$1 at Dollar Tree
- Terra Cotta Potts- $1.76 for medium sized terra cotta pot and $0.38 for a mini-terra cotta pot at Wal-Mart
- Glass Clear Cups- $1 each at Dollar Tree
- Mini Glass Jars- Not sure where you can pick these up as they were given to me by Anthony's grandma Jeri. I suppose Michaels or Jo-Ann's or another craft store might carry similar


Comments
Post a Comment