Catch – A – Wave With Me!
I have been super
excited to bring this DIY to you guys. It is my all time favorite DIY so far
and I love looking at it. I put it by my front door on my crate table I made
and blogged about not long ago.
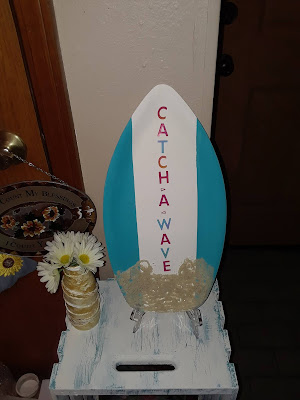
So I know it is still winter and almost spring but Dollar Tree gets these surfboard trays almost every year in the summer and I did this craft last summer and not before long they will get some in and I have seen some cool uses for these and was happy to put my own spin on them.
I took a plastic surfboard tray and took my ivory chalk paint and panted the whole board. It took a few layers to cover the color of the plastic. Now I took tape and adhered it to the area I wanted to create the sides but the way the board is I couldn’t get it perfect but I like it anyway. So once the tape was adhered I painted the sides with my Lagoon blue chalk paint and again a few coats were needed. Once dry I slowly removed the tape.
Now once it was dried I decided to adhere the letters so I knew where they would end before I added the sand so that I didn’t run out of room on the board. I had found these cool colored letters in blue, orange and hot pink they look like cool beach colors and knew they’d be perfect. Some people simply wrote surfs up and such but I wanted something else so I looked for surfing phrases and saw catch a wave and I loved it so stayed with it. To break up the words I used the arrow pieces that had been in the center of the A letters but had come off.
Now came the part that Youtubers helped with. They had added white glue and sprinkled sand on to make it look like it had been resting in the sand so I borrowed that method. I poured the glue on in an uneven method and let the sand fall and I did that a few times until the sand was clumpy the way I preferred.
So I decided to place this on the small crate table I created by the front door as the table looks aged and kind of like the ocean itself. I had a plastic picture easel to hold the surfboard in place, it does a pretty good job though it does get bumped over a few times, but I still love the placement. Now I took to decorating it and it was so much fun. I took and cut some of the fish netting I purchased and I took my wood repair pens and rubbed them over the net to age it so it wasn’t so crisp and then I placed it around the bottom of the surfboard. I took some seashells I had and placed them around the netting as if caught in it which seemed organic and natural.
I wanted something to be like sea life like coral or seaweed so I saw some willow sprigs in Dollar Tree and purchased them as the yellow ones when cut down and placed beside the board appear sea related.
The last element, the message in a bottle, which I painted the black cap a sandy color and then filled it with tan sand and put some colorful mini seashells in the bottle. The mini seashells I got at Michaels with a 40% off coupon. The last thing was the message. I had some left over antique scrapbook paper left over from my husband’s anniversary gift last year and so I cut a piece off then rolled it up and took a sticky pearl and closed the scroll with the pearl and placed it within the bottle and placed the bottle beside the surfboard.
You can’t see in the pictures here but I later added a model ship I have and it is kind of heading behind the surfboard on the left side and then added this cool campfire element which is pictured below.
Camp Fire:
I took a strip of burlap and measured it to fit this glass cup and I took and roughly covered the burlap in ivory chalk paint and then hot glued it to the glass. I then took some wood chunks and hot glued them to the burlap and each other all the way around and that was a challenge as they kept wanting to fall off but once done I took some twine and tied it around the chunks of wood a few times and them made a bow and let the ends dangle over the edges of the table where I placed it beside the surfboard. I placed a LED tea light inside and voila it was like a campfire on the beach.
There are so many ways you can go with this cute surfboard and even the campfire! Just have fun with it!
·
Surfboard
Platter- $1 at Dollar Tree
·
Cool
Summer Letters- $1 for pack at Dollar Tree
·
Ivory
Chalk Paint- $1.68 for 2 oz bottle at Walmart or larger bottles can be
purchased for almost $7
·
Lagoon
Chalk Paint- $1.68 for 2 oz bottle at Walmart or larger bottles can be
purchased for almost $7
·
White
Glue- $1 at Dollar Tree
·
Sand- $1
for a pack at Dollar Tree and they come in beige, black or white
·
Fish
Netting- $1 at Dollar Tree and they come in beige or green
·
Seashells-
$1 at Dollar Tree and then a few dollars for the smaller ones at Michaels
·
Willow
Sprigs- $1 at Dollar Tree
·
Message
Bottle- Free from my husband’s grandmother but they can be purchased for a few
dollars at most craft stores
Burlap- $1 at Dollar Tree
Glass Cup- $1 at Dollar Tree
Wood Chunks- $1 for a bag at Dollar Tree
Burlap- $1 at Dollar Tree
Glass Cup- $1 at Dollar Tree
Wood Chunks- $1 for a bag at Dollar Tree


Comments
Post a Comment